So you have finished installing WordPress on your site and are thinking about what to do next. You may be thinking about installing plugins or starting to work on publishing content to your site.
But wait…
There are other things to do on the backend after installing WordPress but before you start any work on the front end.
Imagine, you’ve just purchased a new mobile phone. Do you start using it, as it is, right out of the box? No, of course not. Because you want your contacts, your photos, and other personal information on your new phone. A new WordPress install is similar to our phone analogy.
The fundamental technical aspects of any site, whether big or small, WordPress or Drupal are the same.
The 15 Most Important Things to Do After Installing WordPress
These following checklist details 15 items that lay the foundation for your website to be easily found, improve your SEO and maintain appearance across all of your brand channels.
1. Setup the Site Title
Your site title and tagline indicates to individuals and search engines what your website is about. Your branding is unique and your website title and tagline should reflect it. On top of that, it’s easy to modify your site title and tagline on WordPress.
Once you have logged into your dashboard, go to WordPress Settings > General.
The “Site Title” is displayed to search engines and users as the name of your site. It also appears in various locations such as the title bar of the browser as well as the admin bar of your WordPress Dashboard.
While the title of your site doesn’t have to be the same as your site’s URL, it is a good idea to keep it short.
The tagline is a brief explanation of what your site is about. If your brand has a tagline or a slogan, this is an ideal location to show it.
WordPress’ default tagline text is “Just another WordPress website”. Even if you do not have a tagline, it’s important to delete the default texts and leave it blank.
2. Update the Timezone
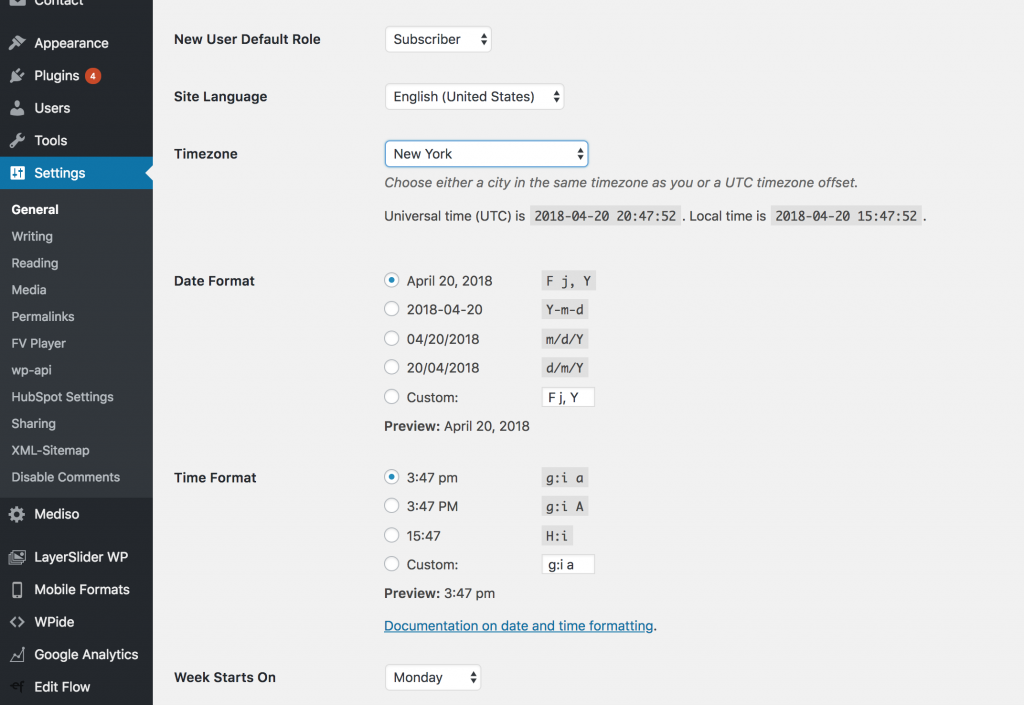
One of the easier oversites is to leave the timezone default. While it might not seem like a big problem, down the road, when you want to use scheduling this can cause problems. Ensure the timezone is set to your local timezone.
To set the Timezone, go to Settings > General. Then, scroll down and you will see a choice for Timezone, Date and Time formats. After setting timezone, don’t forget to click “Save Changes” to save the settings.
3. Decide between using WWW or non-WWW for the site URL
WordPress offers us the ability to pick between a www and a non-www version for our site URL.
In the initial setup process, there is not much difference between both the variations. However it’s important to choose one when setting up the website, and stick to it in the future. Switching between both the versions time to time lead to duplicate pages. Making it harder to rank your website on Google and more difficult for users to find you.
After you’ve made your decision you can make the change, if needed from Settings > General.
4. Change Your Permalink Structure
Permalinks are the permanent URLs to the specific pages, articles, and resources on your website. The link to each piece of content should be permanent and never change.
By default, the WordPress permalink structure looks something like “yourdomain.com/?p=456”. While not being visually friendly it’s also not SEO friendly as no information is relayed in it.
It’s a good idea to change the permalink before you begin creating pages on your website. You can easily do this by going to your WordPress Settings > Permalinks and picking one of the 5 default structures. You can also type in your own custom structure.
5. Upload a Favicon
A favicon is a small graphic that specifies your site across the web. It belongs to your site’s visual identity and assists individuals to quickly and rapidly identify your website in their browser tabs.
Typically the Favicon is a visual graphic from your logo or a component of your logo without any copy. It’s easy to upload a Favicon, first go to WordPress Appearance > Customize > Site Identity. From there click on the choose file button and upload the image you want to utilize as a site icon. After that, click on “Publish” to save the new settings.
6. Remove Sample Content
Returning to our phone analogy. When you get a new phone, there are a few pre-installed programs. The same happens with a fresh WordPress install. A dummy sample post, called “Hello World” is automatically added. It is there so you can see something on your site instead of seeing it entirely blank.
However it, unlike some pre-installed programs on your phone, isn’t a post that you should keep.
To delete the sample post, go to posts and hover on the “Hello World” post. You will see the trash option appear. Clicking it moves the post to the trash, and afterward you can go to “trash”, again hover over the exact same post and click then delete permanently.
Note: The same method is used to delete the sample page. You should navigate to pages and hover on the “sample page”. You should see the Trash option. Click it, then go to “trash” from where you can delete the sample page permanently.
7. Enable or Disable Registration
If you wish to run a multi-author WordPress site, where numerous users have the ability to sign in and add content or comment on posts, you will need to first make it possible for them to register on your website.
You can always disable the registration choice if you are going to be a single author. Complete Themes has complete step-by-step instructions here.
8. Choose Your Discussion Settings
You can customize what information is collected and shown below posts in your WordPress comments section. It’s important to decide if you will want to collect your user’s complete name and email, or if want to require them to be a registered user with an account before they can comment. Maybe you want to manually monitor each comment and approve it before it is published. All of these methods will ensure the correct people are contributing to your website and spam is reduced.
You can find all these settings under the dashboard in Settings > Discussion.
Adding Categories and Tags to Your Posts
WordPress comes with the ability to add categories and tags to your posts and pages. Categories are pre-defined taxonomies used to sort and group content into different broad sections.
WordPress comes with a default category for blogs labeled “Uncategorized”. If you don’t add a specific category for your new posts, WordPress will automatically add the default category to your post. However it does not provide information to the user, and we recommend adding more categories to help improve your SEO.
While you can always add categories at a later date, if you have some general topics you already publish it’s a good idea to add them right off the bat. To add a new category for your post, go to Posts > Categories, write the category name and publish it. If you desire, you can also write a description for each category. Some styles will display that description in the archive page, and it’s helps search engines better promote your content to users.
Tags, like categories, help with SEO and allow your users to find articles and topics more easily, however, they are more specific than categories as well. You can think of tags like a keyword or a phrase.
10. Complete Your User Profile
Once you’ve set up your WordPress you will become its first user. To register you need to provide basic information like your name and email. You can also add more information, a photo and link to social media accounts if desired. As you add other users, or guest posts you can assign each article to the corresponding user and then allow users to search by the author too.
To update your information go to Users > Your Profile and fill in as much as you want to complete your profile.
11. Change Default Sidebar Widgets
By default, WordPress puts some widgets on the main sidebar. They can be easily dragged and dropped to particular areas of your site, known as widget-ready areas. These widget-read areas give design and structure control to the user. There are many available widgets but the common ones include, search box, archives, recent posts, meta, and categories.
However, WordPress comes default with some that are less than useful for the majority of our nonprofit and small business clients. 90% of the time we recommend removing a few pre-installed widgets including “archives”, and the “meta” widgets.
With different WordPress themes, you may see different sidebar options. It’s important to research the ones that come pre-installed, and remove any your research informs you would not be beneficial.
Note: Don’t panic, if you add or remove a widget, you can always add it back. To manage your sidebars or footer widgets, go to Appearance > Widget, from there you can add or remove any widget from any position.
12. Setup a Contact Form
After establishing your website, it’s necessary to include a contact form, whether you are a business, nonprofit organization, e-commerce or simple blog. The easier you make it for users to contact you the better.
While it may be tempting to simply put your email address and allow people to write to your directly this leads to a lot of spam. The best way to offset this is to use a contact form, and install Google Captcha to prevent spam bots.
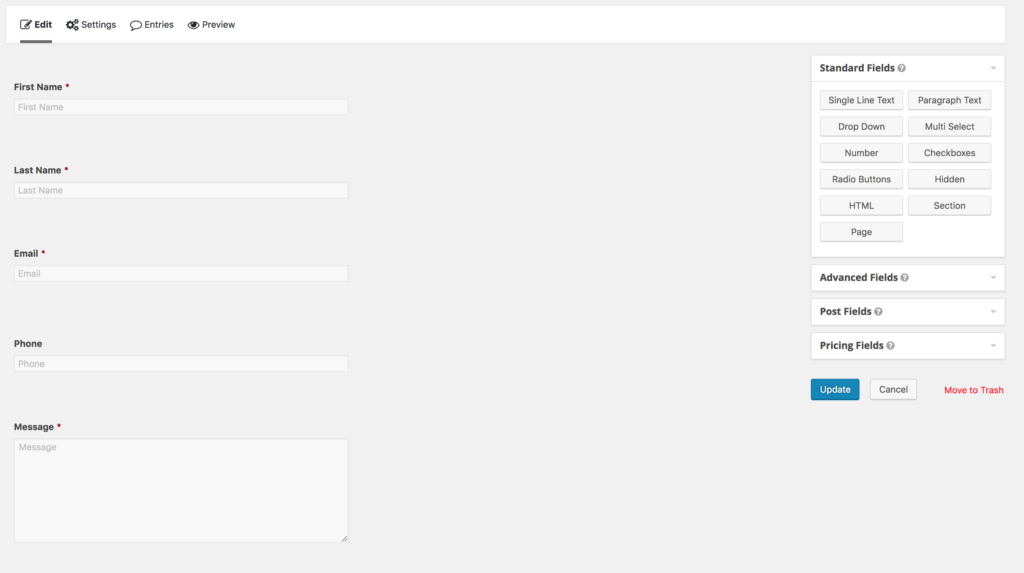
Gravity form is AmDee’s top choice. It markets itself as “the Easiest Tool to Create Advanced Forms for Your WordPress-Powered Website.” While there is a fee associated with gravity forms it integrates with a variety of other platforms, allows you to quickly build forms using their drag and drop features.
Gravity form allows you to develop common fields like email addresses, names, subjects, and messages as well as more advanced allowing users to upload files, images or even pricing fields. You can even add captcha to prevent spammers from filling the form.
13. Delete Unused Plugins and Themes
The default install of WordPress comes with 2 different installed plugins, “Hello Dolly” and “Akismet”. While it is wise to keep “Akismet” as it is the best plugin to prevent spam from comments on your website. “Hello Dolly” is a plugin that isn’t of much value. It is easy to remove unused plugins and helps keep your site clean in the future.
When you are logged in as an administrator it is easy to delete a plugin. Navigate to Plugins > Installed plugins. From there first, deactivate the plugins and delete it then.
In a similar way, you should delete unused themes. By keeping different WordPress themes installed you can run into serious security issues. But deleting unused WordPress themes can be the solution.
To delete a theme, go to Appearance > Themes and click on theme details. From there, you can see the delete option. Click on delete to remove the theme.
14. Install an SEO and Google Analytics Plugin
Most websites see a significant amount of traffic through search engines. Using best SEO practices helps make your blog site search engine friendly and enhance the SEO of their WordPress sites. There are some great SEO plugins that help you improve your SEO, and Google Analytics, by alerting you if you should add images, or keywords, as well as other best practice advice. More than that, an SEO plugin can help you to write better content for improved SEO so that you can rank your post more easily within search engines.
If you want to track your website visitors, then Google Analytics is the ideal choice. It offers in-depth information about website traffic. You first need to register your site with the Google Analytics service and then you can integrate Google Analytics into your site. We did a 4 part series detailing how to do this, including things to know before you start using Google Analytics, tracking your website with Google Analytics tracking code, Understanding Google Analytics reports and moving your organization to advanced analytics.
After your google analytics is integrated you can also install a plugin that will allow you to check your traffic stats right from your WordPress dashboard.
15. Install a Backup Plugin
With what feels like the majority of our lives spent on our computers, backups are necessary for all digital content.
You can think of your website as your digital billboard. If something were to happen to wipe out your site tomorrow would you be rebuilding from the ground, or would you have a platform to put the billboard back on?
There are a majority of things that can take your website down. It can be a malicious attack, the more popular your site, the higher the chance someone will attempt to compromise it by hacking. Or it may be that a WordPress update, plugin or theme conflicted and caused your site to crash.
No matter what brings your site down, having a backup can save you weeks if not months of work to get your digital presence back up and running.
However, WordPress does not have a built-in backup system. So it’s vital to use a plugin like Backup Guard, Restore plugin, or AmDee’s preference UpDraftPlus Backup.
Another option, but not one we recommend, is to manually perform backups and store it to Google Drive, Onedrive or Dropbox.
Final Thoughts
While it’s tempting to go for the instant gratification of immediately getting content to your site, with a little more planning your site will have improved your SEO, become more user-friend and be backed up should the worst happen.
You May Also Like

Having a website is an absolute necessity for any business. Gone are the days when you could simply update your website once and forget about it for months on end. In today’s ever-changing digital landscape it is important to constantly track and measure how well your website performs, as well…
read more >
Thomas Bertram (T. Bert) Lance famously said, "If it ain't broke, don't fix it." Unfortunately, T. Bert Lance couldn’t foresee the future. He didn’t know that over 94% of Americans would be on the internet by 2024. If your website doesn't receive periodic updates or isn't accessible, users can become…
read more >


